Glossy Theme Setup Guide
If you've chosen glossy as your public site theme, here are some quick start tips to getting everything set up!
The Front Page
The front page of your site is a very specific page - it contains your slider images (more on sliders at the bottom of the page) and it cannot be directly edited. Content on the front page is controlled by blocks. You can use pre-set blocks to add content automatically, or create your own custom blocks to add content that you write. Read more about blocks at the bottom of this page.
Menu
To edit your menu and links, go to: Settings and admin > Site settings > Menus
You'll want to edit the "Main Menu" to change the main links that appear near your logo. The User menu contains your login links. Read mroe about adding menu items here.
Is your menu bunched up all on one side?
The css for this theme needs to be uncompressed. In the url bar, add this to your site's url "/admin/config/development/performance"
example: http://yoursite.groupanizer.com/admin/config/development/performance
Then uncheck the option to "Aggregate and compress CSS files"
Theme Settings
You have several theme colour choices in glossy.
These can all be found on the "Public theme appearance" page, located in the public site area.
This is also where you can control the button and the teaser text that appears on the front page. It's located in the tab along the side called "Front page".
You can disable this button and teaser text by checkmarking the box that says "Disable front page teaser text?"
There's also an option to use custom html for your fornt page. We do not recommend doing this unless you're familiar with html and moving text and images into the layout you want. If you wish to use it, checkmark the box to enable "Display Custom HTML as main content in your Front page?". Then fill in your custom text in the "front page editor" text box.
Remember to save any changes you make using the button at the bottom of the page.
Access this page in the side menu by going to:
Public site > Public theme appearance
Logo
The first time you switch to a theme, you will need to upload your logo again. Be mindful of the logo style you're choosing to make sure that the size and orientation (portrait or landscape) fits with the style of your theme.
Logos are uploaded in the "Public theme appearance" page, which is located in the public site area. There will be a field to upload it right from your computer once you uncheck using the default image. Be sure to save the page to compete the upload.
Additional information on logo formatting
Most headers will stretch to accommodate the size of the logo. This can look a bit awkward in the glossy theme and the main menu links will stay at the top and create a bunch of space below.
If you have a larger logo, you can use the css injector to force the header to remain small. This means the bottom portion will overhang the header and overlap your slider images.
The css injector is located in the "Public site area". You'll want to add a new rule. Use a title that you'll remember what this css code is for - something like "header" would work.
#header-main-content-inner {
height:83px;
}
#region-featured-slideshow {
top:-20px;
max-height:414px;
}
.main-menu {
margin-top:20px;
}
.logo-img, .site-slogan {
margin-top:-2em;
position:relative;
z-index:100;
}
#region-branding {
margin-bottom:-40px;
}
#block-block-11 {
float:right;
}
#block-follow-site {
margin:6px 6px 0 0;
}
@media (max-width: 785px) {
#header-main-content-inner {
padding-bottom:2em;
}}
Set it so it only appears on the theme "glossy". Then save the rule, and refresh your site.
Slider Images
The "slider" is the set of rotating images on your front page. They are sometimes called "banners".
Sliders in this theme are controlled by "featured pages". You can add featured pages to add new sliders - or edit exiting featured pages to edit or delete old ones.
Pro tip: you can find all of your current featured pages using the "Content" page (settings and admin) and filtering for type = feature page.
Remove the text area from the sliders
Some glossy theme users prefer to use graphics or text int heir sliders, and they don't want the text area on the right side of the slider with the "read more" button. If you'd like to do that instead as well, you'll need to use the css injector and add this bit of code:
.nivo-caption {
display:none !important;
}
The css injector is located in the "Public site area". You'll want to add a new rule. Use a title that you'll remember what this css code is for - something like "slider text" would work.
Set it so it only appears on the theme "glossy". Then save the rule, and refresh your site.
Blocks
Throwing a few blocks into place will help you see the layout of your new public theme.
Here's the simplest way to start with the the glossy theme:
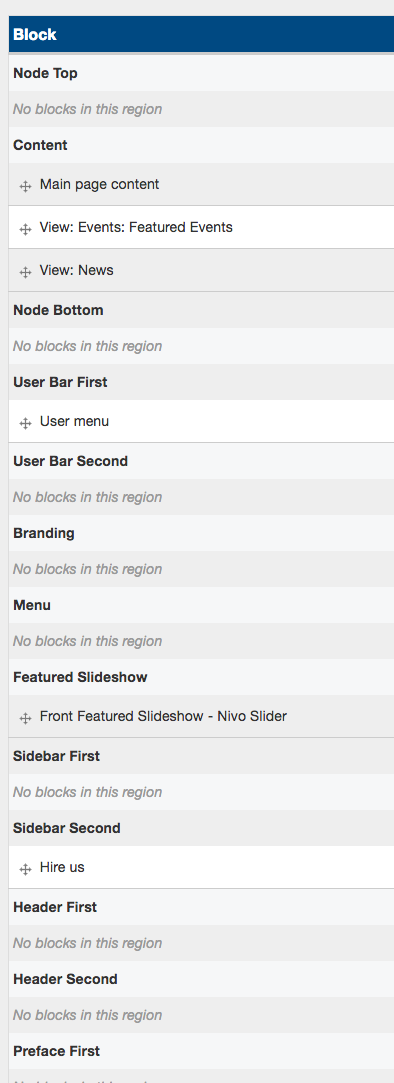
These blocks are the standard ones used on the glossy theme. Other important blocks include the buzz block, which is often in the side bar, or the Our Location block, which is often in one of the footer areas.
You can place a lot of blocks in the side bar - this is the panel that runs along the right hand side. These blocks should be configured to only display on certain pages. More information on blocks is available here.
Are certain blocks or regions missing from your blocks page?
Go to your "public site controls" page and select the "force refresh" checkbox, then save the configuration.
_